You are currently browsing the tag archive for the ‘Canon’ tag.
I have several of the new Pocket Wizard TT5 units. First thing that crossed my mind when I received them…”Is this going to last in the field???” A heavy flash stuck on top of a TT5. Ok, metal hotshoe with a metal foot on the 580exII. Seems secure. Then a plastic foot on the TT5??? I feel safer using the threads when working with stands. Some products like the Lastolite EzyBox use the foot as an attachment. Several months passed and so far so good. Then the other day I broke the feet off two separate units! Two of them in less than an hour! Not happy! I don’t have time to send two of these in for repairs. I called up PW tech support and they directed me to the parts department. PW has awesome support. (yeah yeah, please resist the urge to joke about the range thing…) The people I dealt with were knowledgeable and very helpful. They explained how I can change the hotshoe myself if I didn’t have time to send in my units. Sounds good to me. $20 per unit was the cost. They arrived within two days. Swapping these in was a piece of cake!
So lets begin!
First you need a pocket wizard. Your own, or a friend in need’s unit will do. A small Philips screwdriver and a new hotshoe are all you need.

Next, Turn the TT5 over and remove the 4 screws surrounding the foot. That are located at each corner around the foot. You may have to rotate the foot lock in order to see or access them.

The hotshoe and foot are a combined unit that will pop out from the bottom of the TT5. If they don’t, just push down on the hotshoe and it will come right out. Careful because there is a cable attached.

Pull the cable out from the board located between the hotshoe and foot. A gentle tug is all that is required.

Carefully attach the cable to the new hotshot unit. The cable slides into the connector. It is easy to line it up and then ease it in with your finger. It does not go very far to make a connection. Be careful not to over do it. You wouldn’t want to damage the cable end or the hotshoe connector.

Carefully push the cable back into the body of the TT5 as you reinsert the hotshoe unit into its proper place. It should fit perfectly back in place. If it doesn’t you may have pinched the cable between the hotshoe unit and the body of the TT5. Once the hotshoe is in place, screw it back together with the four screws that were removed. Add batteries and double check everything works. You are all done! Five minutes is all it takes to replace your hotshoe or broken foot on a TT5!
Here is a comparison of a new foot and one of my broken ones.

So I did something the other day we are all advised never to do. I looked at the sun through my camera. Well, i’ve done that before and learned my lesson, but this time I wanted to see what would happen with live view. (not for long either, I didn’t want to burn my sensor or something…)
So I had my 5DII with a 100mm Macro lens. I set the camera to live view and stopped down to F32. (1/125 at ISO 200) I was expecting some kind of sun star and / or weird flare. I never expected this! No post processing either, this is basically straight from the camera. How interesting!

Rainbow Sun Star
So I was shopping the big “canons” lately. I recently have regular need for some reach and did not want to keep renting. The 300 2.8L and the 400 were absolutely awesome. Either would have been nice…if I had arms like the hulk! So, in the meantime while I work out til I sweat developer, I decided to go for the 300 f4L. The f4 was also a fraction of the price. I didn’t really want to spend 6g on a specialty canon lens because of other reasons though…reasons that will be revealed on september 9th…and might just have something to do with Leica….
Anyways, I am absolutely in love with the 300 f4L. I didn’t realize how close it can focus! Beautiful background blur and color at its closest focal distance. I won’t be getting anywhere near the MP-E65 level of capturing bug’s eyes…but this lens will do great on much large subjects while including some of the environment. I have not yet tried it with extension tubes.
Here is a shot with the lens I took the other day getting acquainted with it. 1/500, F/4.5 , ISO 200, natural light.

The Moth
It is 2009 and we are in a year of amazing resolutions! No, no, not exercise or painting the house…sensor resolution! Phase One has their P65+ 60mp medium format back, Nikon has the D3X @ 24.5mp, Sony A900 @ 25mp, and the Canon 5DmkII and 1DsmkIII @ 21.1mp. Even point and shoot cameras are hitting 15mp!!! Just a year or two ago, getting in the 20+ mp range would involve spending $20,000 – $30,000 US on a digital medium format system and lenses.
So, everyone knows this already. Why post about it? I have finally gotten a chance to experience this first hand. I have been using 5Ds since their release several years ago. I am familiar with what they can produce, how much I can stretch the RAW, and how much I have to work with in terms of printing large. The 5D is a serious workhorse that always impressed me. I’ve got my 5DmkII upon release in December 2008. It really felt like a modern and refined 5D. Fantastic quality in the images, amazing print size for a 35mm, and some great new features. Ok. Great! Until…yesterday.
I have begun shooting a new body of work this past week. When I loaded the work into Bridge, I was stunned. I myself have never seen work from my cameras that contained such detail. 21+ MP can really do some amazing things! I don’t remember shooting with other 35mm cameras that revealed such minute detail. Mosaic tiles, marble, columns, inlays, etc… all reveal themselves with intricate detail on these images! At the distance I am from these features, I am just absolutely amazed at how distinguished details can be resolved with good glass, technique, and these new sensors!
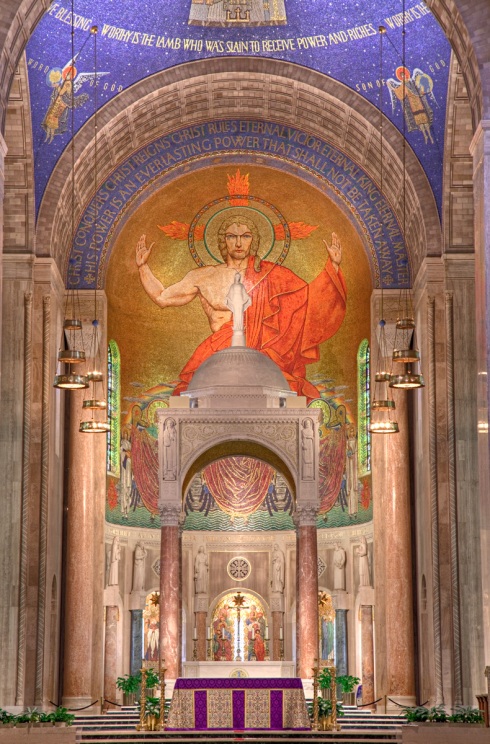
Here is one example, downsized for the web. This is a combination of 3 images left completely default in ACR and combined in Photomatix. This shot is using a 24-105L @ 105mm, f/13, 1.5s, 6s, and 20 second exposures. ISO 200, Highlight tone priority on, and all noise reduction is off, except for long exposure noise which is set to auto. I use a tripod with a spherical panoramic head. I shot with a cable release, 2 second timer, and live view on. (quick and easy mirror lock up!)

© 2009 Ancient City Photography
For a sense of scale, the altar with the purple cloth at the center bottom of the image is approximately 4.5 feet high. I was a couple hundred feet back.
Here is a center crop @ 100%.

© 2009 Ancient City Photography
Here is a corner crop @ 100%.

© 2009 Ancient City Photography
I am sure sharpness would be even better with a fast exposure and an uncombined shot, but I am looking at real world results for the work I need to produce. I think this is simply stunning from a 35mm camera. Adjust contrast, add some sharpening for output, and it’s just awesome. So…I wonder what we will be working with in a few years from now! Some people spend all their time looking at 100% crops for sharpness and splitting hairs…but I am impressed no matter what.
These new cameras are simply awesome.
FINALLY! Canon has announced 2 new tilt-shift lenses. One is a 24mm and the other a 17mm. A 17mm shifting lenses is somewhat amazing and certainly a first as far as I am aware of. So they have now 17, 24, 45, and 90mm TS lenses available. (the 35mm was an FD mount)
The new lenses tilt and rotate separately from the shift and rotation function, a very welcomed update! Why am I so excited? Because I have been using Mamiya lenses mounted on shift-adapters on my Canon 5Ds. A medium format lens has a much greater image circle and works just fine as a shift lens on a 35mm camera. There is hardly any light falloff even at 12mm shifts. I think the widest rectilinear MF lens I have found so far is the Mamiya 35mm f/3.5 Sekor C. (See why I’m excited for this new 17mm!!)
I look forward to adding the new 24mm TS to my lineup. I prefer that to the 17 at the moment strictly for the 82mm filter thread. The 17 does not look like it will accept any form of frontal filter.
A lot of people seem to think Tilt-Shift lenses are a gimmick and used only as novelty by a few bored photographers. This is hardly the case. Camera movements are still king when it comes to image control. Many areas of commercial photography utilize movements extensively. There are several solutions for getting movements on a digital camera. The exotic stuff from Cambo and SINAR are great, but expensive and very specialized. (Especially if you want to play in the medium format digital range!) These are not always practical solutions. Who really wants to lug a 4×5 with a MF back and a laptop around unless completely necessary?
Another major benefit to using a TS lens is seamless panoramas without the need for specialty tripod equipment. Aside from the basic center-left-shift-right-shift 2:1 panorama, you can also do “super-resolution” panos.
Take a center image. Shift the lens all the way to one end. Take another shot, then rotate the lens 15 to 30 degrees at a time and fire off another shot. Continue this until you get all the way around. I get about 12 shots or so. Using Photoshop, PTGUI, or another panorama stitcher, combine the images. There will be no parallax errors since the camera’s nodal point has not moved at all. In fact, the camera hasn’t moved period! You will end up with one massive image!
Example:
My Canon 5DmkII
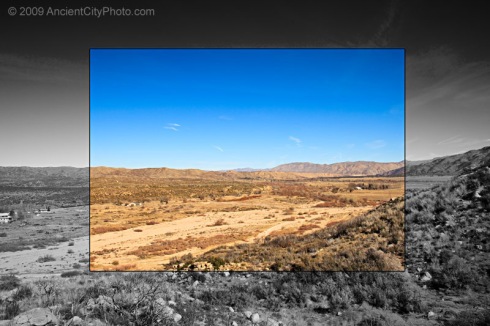
Single image file dimensions: 5616 x 3744 pixels or 18.72 x 12.48 inches @ 300 dpi
Fully shifted file dimensions: 8776 x 5851 pixels or 29.25 x 19.5 inches @ 300 dpi
5DmkII Image: approx. 21mp (Colored inside box)
5DmkII Shifted Pano: approx 51mp (Entire image)

So on just the 5DmkII alone, you can print almost a 40 x 60 inch print @ around 150 dpi WITHOUT needing to up-res the file. Can you imagine the new Phase One P65+ with this technique?!?!?! By my same calculations using the numbers on the PhaseOne site, that gives you a 135mp image with a 90 x 67 inch print at @ 150 dpi. Not owning a PhaseOne system, I cannot vouch for these numbers, however I am more than willing to donate my time and drive space to conduct the tests should a system be made available!!!
Then again…do we need 135mp images when we resize for the web most of the time? When most images are limited by the paper they are printed on, does that level of quality really make a difference if we aren’t printing at those massive sizes?
Being a panoramic photographer, a lot of my work is making 9:1 images…I guess i’m partial to these large scales!
What a great time to be in photography!
